Today we are excited to announce two major updates to our flagship products–The Events Calendar Pro and Event Tickets!
The Events Calendar Pro now comes with a new block for the WordPress block editor called Calendar Embed. This new block gives you all the power of our popular Tribe Events Shortcode in the form of a WordPress block with easy to adjust settings. This is a great visual way to embed and edit calendars anywhere you can use blocks on your site!
Event Tickets now has an All Tickets screen that functions as a central hub for all of the tickets you’ve created across your website–whether they’re attached to events you’ve created with The Events Calendar or simply tickets you’ve created and embeded on a post or page. This is a game-changer for anyone managing tickets on WordPress!
Let’s dive into the details and learn what’s possible with these powerful new features!
Meet the Embed Calendar block for The Events Calendar Pro
One of the most used features of The Events Calendar Pro is the Tribe Events Shortcode that allows you to add a calendar (along with many specifying attributes) to any page or post on your website.
While shortcodes are great, finding the right combination of attributes and adding them into the shortcode correctly can be a bit of a drag. Enter, the new Embed Calendar block!
To add the new Embed Calendar block to any page or post where the block editor is enabled, simply use the / command and type “Calendar”. Then select the Calendar Embed option. Alternatively, you can click the + icon and search for the block there.

This handy new block brings the power and convenience of the shortcode into a visual interface making it easier than ever to display the events you want, where you want to display them.
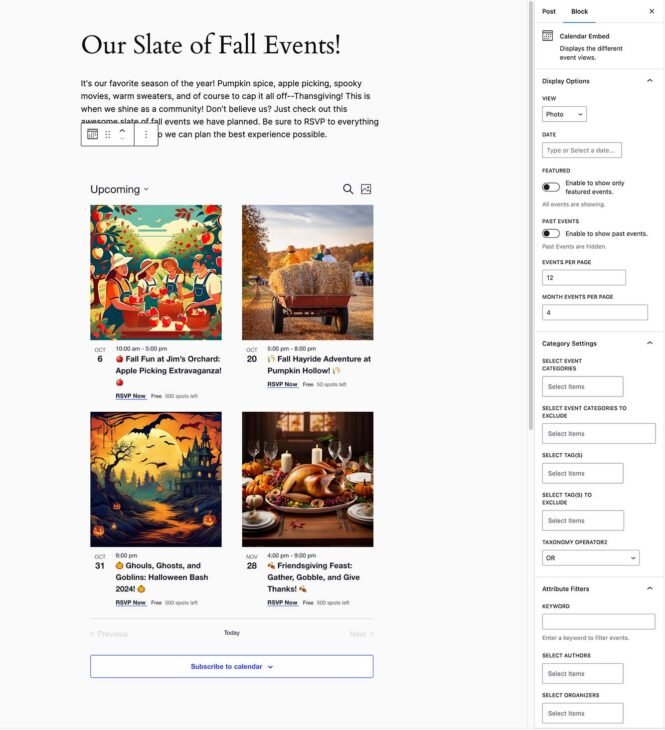
The block settings in the sidebar remove the need to find and insert shortcode attributions, save the changes, and then preview them on the frontend. Now, all you need to do is configure these settings with a few clicks and you’re able to see changes to your calendar embed in real time.
An overview of the new Embed Calendar block for The Events Calendar Pro
After you’ve added the Embed Calendar block to your post or page, it’s time to configure the settings. There are four settings groups:
- Display Options
- Category Settings
- Attribute Filters
- Bar Toggles
Let’s see what we’re working with.
Display Options
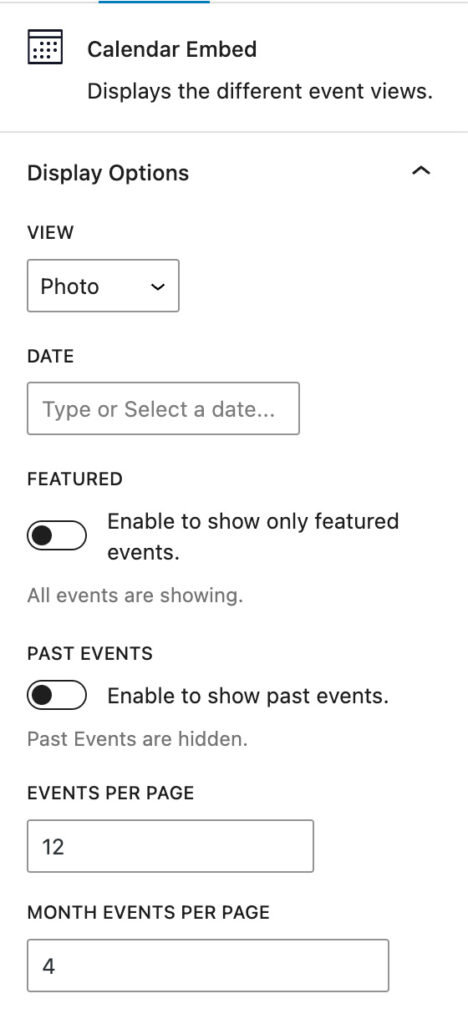
- View: you have the option to display events as a list, as a full calendar month, by a single day, in a summary (compressed list), photo view (shown above), by week, or on a map. These views provide you with a lot of options for displaying your calendar/events in different areas of your website.
- Date: the date setting allows you to choose a starting date for the calendar. For example, if I have an event on October 6th and set the date to the 8th, it will omit the event on the 6th and show everything after the start date I set.
- Featured: toggling this on means only featured events will be shown.
- Past Events: toggling this on means past events will show up, assuming the start date is also set in the past.
- Events Per Page: maximum number of events that will be displayed per page.
- Month Events Per Page: maximum number of events from a single month that will be displayed.
Category Settings

- Select/Exclude Event Categories: the top two settings give you the ability to choose the event categories you want to include or exclude from the embeded calendar.
- Select/Exclude Event Tags: the tag settings give you the ability to choose the event tags you want to include or exclude from the embeded calendar.
- Taxonomy Operator: this setting provides another way for you to choose which events are displayed based on the taxonomies selected above it. For example, if you select a category and a tag and the Taxonomy Operator setting is set to “OR”, then it will show all events in that category and all events with that tag. If you select “AND” then it will only show events that are in that category and that have that tag.
Attributes Filters
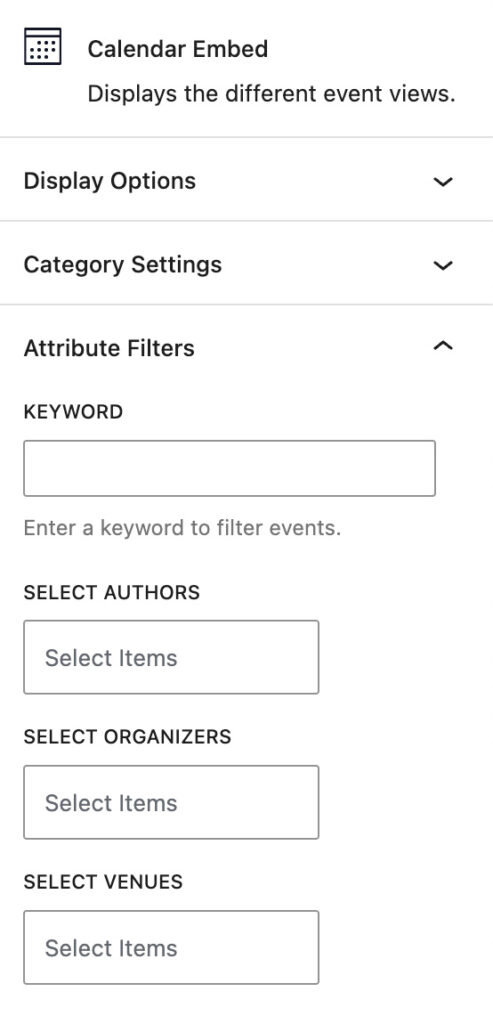
- Keyword: this allows you to select a keyword as a filter from an event’s title, like “fall” in the example above. In that case, it would exclude the “Halloween Bash” and “Friendsgiving Feast” since they don’t have “fall” in the title.
- Select Authors/Organizers/Venues: these settings allow you to filter which events are shown by authors, organizers, or venues.
Bar Toggles
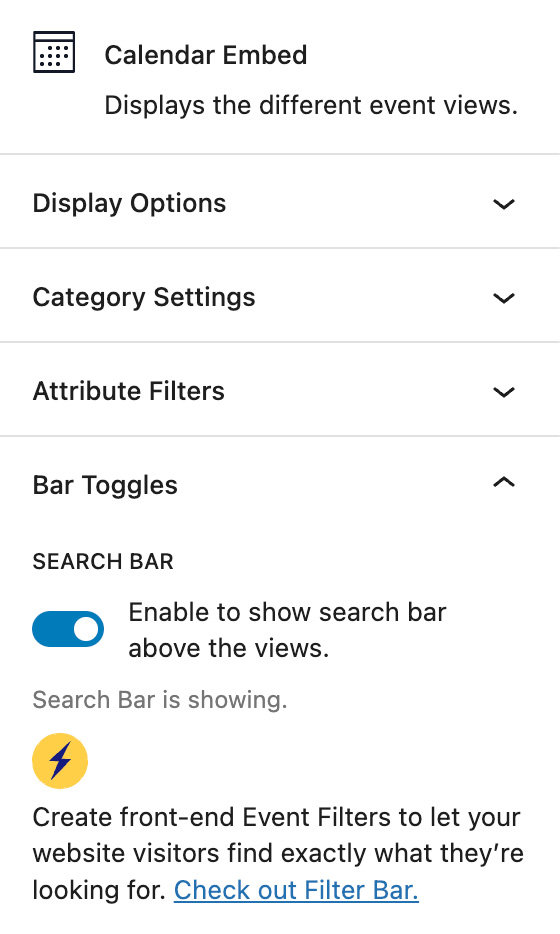
- Search Bar: this setting allows you to toggle the search bar of the calendar on or off.
- Filter Bar: if you have the filter bar add-on, this setting will allow you to toggle it on or off.
The Calendar Embed block deepens The Event Calendar’s compatibility with the WordPress block editor
One of the ongoing initiatives behind the scenes here at The Events Calendar Pro is improving our products’ integration with the WordPress block editor. That means moving away from a reliance on shortcodes and custom styling with code and embracing a more visual approach to creating content. The Calendar Embed block is an important milestone on this journey, but there’s more to come. Our next big push in this area will be improving the block editor experience on the event post type. Stay tuned!
Meet the new All Tickets screen for Event Tickets
In our last Event Tickets feature release we rolled out a new Orders screen to help you manage ticket orders. This week we’re rolling out a new All Tickets screen that helps you manage the tickets you’ve created.
This represents a huge improvement in user experience for anyone managing event tickets and is yet another improvement aimed at making the Event Tickets plugin the best standalone solution for selling tickets on WordPress.
Here’s everything you need to know about this awesome new update!
An overview of the new All Tickets screen for Event Tickets

To view the new All Tickets screen navigate in your WordPress Admin to Tickets > All Tickets. As you can see, this page brings together every ticket you’ve created across your whole website. That could include tickets you’ve created on individual posts or pages as well as tickets you’ve added to events using The Events Calendar plugin.
Filter and search tickets

Right away you’ll notice at the top of the table there is a dropdown where you can filter tickets by status–Active Tickets, Past Tickets, Upcoming Tickets, Discounted Tickets, and of course All Tickets. You can also search by Ticket Name or Event Name.
Tickets columns and sorting

By default the table displays tickets with the following information as columns:
- Ticket Name
- Event
- Sale Ends (the date that ticket will stop being sold)
- Price
- Sold
- Remaining (number of tickets that can still be sold)

Under screen options at the top of the screen, you can choose to display other columns too:
- Ticket ID
- Sale Starts (the date ticket sales begin being sold)
- Days Remaining (number of days left before the Sale Ends date)
- Sales (price x sold will equal the Sales number)

These columns can be sorted A-Z or Z-A by each column where up and down arrows appear next to the column heading.
Ticket links

There are two links in each row that are immediately visible, the Ticket Name and Event. Both of these links will go to the same location. Either, the editor screen for the post or page that ticket is embedded in or (in the case of tickets attached to events created using The Events Calendar) the editor screen for the associated event.

If you hover over the event name, two more links will appear–Orders and Attendees. In each case these links will take you to a separate screen where you can view the individual orders or attendees associated with that ticket.
Third-party ecommerce integration with Event Tickets Plus

For users who are using Event Tickets Plus along with a third party eCommerce solution such as Easy Digital Downloads or WooCommerce will notice one additional setting on the All Tickets screen. A new set of filters where they can choose to view tickets sold through either Tickets Commerce (native to Event Tickets), Easy Digital Downloads, or WooCommerce.
The Events Calendar Pro Series Passes
If you’re using Event Tickets with The Events Calendar Pro, you may have created both event series and series passes. A series pass is like a ticket for all events in a series. These will also show up on the All Tickets screen.
The new All Tickets screen is a big step in the right direction for Event Tickets’ future
What makes this update so great? Previously, if you were using Event Tickets by itself, you’d have to go to the page or post where you’d created and embedded each individual ticket in order to edit them or find information about those tickets. If you were using Event Tickets with The Events Calendar, you’d have to go to the event the tickets were attached to. Now, you can skip all that hunting and pecking and go straight to the new All Tickets page and find exactly what you’re looking for. Plus, your tickets are displayed with an array of useful information to help you understand sales performance, time remaining before the event, ticket inventory, and more.
Stay tuned for more amazing product updates
That’s all for this update! We hope you enjoy the new Embed Calendar Block for The Events Calendar Pro and Event Tickets’ new All Tickets screen! Both of these updates are intended to make your life as an event manager easier and your work more streamlined.
And we’re not stopping here!
We’ve got a full slate of improvements in the works for Event Tickets and The Events Calendar Pro — as well as a brand new product launch that’s just weeks away. Keep an eye on your inbox for more updates coming soon!
The post Introducing the Embed Calendar Block and All Tickets Screen appeared first on The Events Calendar.